Showing posts with label Sewing. Show all posts

Wednesday, September 4, 2013

Wedding Dresses Turned Blessing Outfits

The idea isn't something new.  Turning your wedding dress into a blessing outfit for your child.  But I remember that even on my wedding day, I knew that one day, the very dress I wore would be one that my own children would wear.  After telling my mom my idea, she happily gave me her wedding dress too.  

So when I was pregnant with my daughter (6  years later) I began to take apart mine and my mothers wedding dresses.  I then asked my Mother In Law if she would sew the dress and make a bonnet to go with the dresses so that I would have a little something from all three of us included in this special dress.

The dress itself is made from my wedding dress.  The lace and buttons are from my mothers wedding dress (the lace had begun to turn cream over the years but was originally white)  My MIL who is an amazing crocheter/knitter made the bonnet.  I have never seen my dress look so amazing.  Unfortunately, though followed to a T, the dress was HUGE on my daughter on her blessing day.  I have later discovered this to be a blessing.  She was able to fit into and wear this dress until she turned 3.  It's been well worn and well washed and I hope one day she will want to pass it along to her daughter, adding her own embellishments to it.

When my son was blessed my MIL also made him an outfit.  The vest is from the lining of my wedding dress, the pants from the skirt of my dress and the bow tie and buttons from my mothers wedding dress.  PERFECT and sooo handsome!
 
Once my daughter turns 8 and is baptized (if she chooses) then we'll make her another white dress out of mine and my mothers dresses again.  Same goes for all my children.  There is more than enough fabric and hopefully she'll love this idea as much as I do.

And then hopefully there will be little scraps of fabric leftover that I'll be able to make each of them a hanky or purse or something small that they can cherish on their own wedding day.  This way they'll each have a little piece of us with them and know how much we love them each day. 

Like I said, the idea has been around for ages.  Heck, I had it 10 years ago.  But if you've not thought of what you are going to do with your wedding dress, this might be something you too consider.


Burp Cloths

My friend Sarah made me a few burp clothes when my daughter was born a few years ago.  As you can see, they are still in excellent shape and going strong.  Ever wanted to throw together a quick baby gift that has that extra touch of homemade?  These are great.  


Items Needed:
Sewing Machine
Flat Cloth Diaper
Cute Fabric
Scissors

Directions:
Head on over HERE for a tutorial on how to make your own!

Pillow Cases

First thought when you think of 50 Shades of Grey?  Yep, that was the theme of one swap I participated in.  For someone who has never read the books (but obviously knows what they are about), I had a hard time trying to come up with a craft.  My friend Tanya though knew EXACTLY what to make and then I felt like DUH, that is an awesome and obvious gift!

She made me two grey pillow cases since most of the book is spent between the sheets.  And now I want matching sheets!  I love the patterns she choose and how well they all go together.  I've never made a pillowcase but after seeing hers, I now want to tackle them.  They seem easy to make and are SUPER cute!  


Rag Baby Quilts

In a craft swap titled "Random Act of Kindness" my friend Jenine made me these two quilts.  One is for me to keep and one is for me to give away as a random act of kindness.  She wanted to do something that tied into my having a baby and a baby quilt was the perfect idea.  

For anyone who knows me, I have a HUGE obsession with homemade quilts.  I LOVE THEM!  Seriously, nothing brings me more happiness in the world than receiving a quilt that someone took hours to create.  It shows me just how much they care an how thoughtful they are.  And seeing as how it's not my strong point (sewing), I certainly LOVE to receive them!  

I decided to keep the brown and blue polk a dot quilt as (unknowingly to Jenine) matches my baby bedding perfectly!  And some lucky person (unknown yet) will receive the green and yellow.  

This type of quilt is called a Rag Quilt and can be  be used with any kind of fabric.  

A great tutorial can be found HERE if you are interested in making one too.


Tuesday, September 3, 2013

Felt Board Pictures

My friend Alicia made my daughter some flannel board photos for a craft swap.  They are so cute and she even used photos of our family in them.  And the best part is that they are SUPER easy to make.  Seriously when she told me how she did them, it was one of those "duh, why didn't I think of that" moments.  These work great for story time, quite activities or even for Church as they'll stick to the back of the bench!


Items Needed:
Pictures - can be printed from computer or photos or magazine cut outs.  
Flannel of any color
Clear vinyl table cloth
Sewing Machine
Scissors

Directions:
1.  Cut out or print out any pictures you wish to use.

2.  Lay picture onto flannel. 

3.  Lay clear vinyl table cloth on top of photo.

4.  Sew around the edges adhering the vinyl table cloth to the flannel.

5.  Cut out around shape of picture.

*Note:  You can also precut the flannel and table cloth before sewing.  The choice is up to you.

Reversible Cup Cozy

I don't drink coffee, but do enjoy a nice cup of hot chocolate every once in a while.  So when it came time to do a 'sewing' swap, I decided to whip up a few of these for my crafting buddies.  

They hare reversible with a button latch and once you get the idea, are pretty easy to make.  I recommend making a bunch of them in a huge batch and then holding onto them as they make great gifts and stocking stuffers.  Just imagine one of these around an empty Starbucks cup with a gift card inside!  Simple, cute and something everyone can use!


Items Needed:
1.  (2) different fabrics (if you want them reversible).
2. A sewing machine!
3.  (2) buttons (one for each side)
4.  An elastic hair band
5.  Felt (inside 'batting')
6.  Scissors
7.  Thread
8.  Iron


Directions:
I did not whip up this pattern all by myself.  I actually followed a tutorial I found and tweaked it to my tastes.  The tutorial can be found HERE as credit should go to those who actually put the time and effort into making such a tutorial.

As you'll note, instead of batting, I used felt.  I found that it held it's shape better than ordinary batting and absorbed the heat!  I also added a button to each side to make it reversible.


Sunday, July 14, 2013

Sticks Card Game - A Rummy Card Game with a Twist

My friend Jenine made this game for me in a swap.  I had never heard of it and found it to be a fun game and great gift!  

This game would take some time to make yourself but would be well worth it.


Items Needed:
4 decks of face cards
42 tongue depressor sticks
Fabric bag or fabric to make your own (make sure you cannot see through it)
1 pen or marker
Directions which can be printed HERE
2 different colors of scrapbook paper
Modpodge
Computer & Printer
Scissors

Directions:
1.  Cover one side of each tongue depressor with one color of scrapbook paper - We'll say Brown.  Modpodge down.

2.  Cover the other side of the tongue depressor with scrapbook paper - We'll say Tan.  Modpodge down.

3.  Attach stick combinations to brown side of each tongue depressor.  Modpodge down.

4.  Cover each side of tongue depressor with an additional layer of modpodge.

5.  Sew bag if you did not purchase one already.

6.  Assemble all items in bag (include directions)

Country Valentines Quilt

If there is one thing you should know about it, it's that I have a LOVE of homemade quilts - though I can't make them myself.  In a Valentines swap, my friend Jennifer got my name and knew my love of quilts.  So she whipped this one up for me and there is no denying it is AMAZING!

I can't give you directions on how to make it, but I can show you and hopefully inspire you the quilt that was given to me.  


Button Snake

In a quiet activity swap I did a few years ago, I received this button snake.  I had never heard of a button snake before then and have found this little gem to be priceless.  It's SUPER easy to make and has really helped my daughter learn about buttons and kept her busy in church and long car rides.


Items Needed:
One large button
12" of ribbon
Varying colors of felt
Needle 
Thread

Directions:
1.  Cut out (12) 3" squares from your felt.  If 3 colors of felt, then you want to cut 4 of each color.

2.  Cut a slit in each felt square large enough for the button to pass through with the exception of one.  Leave one square untouched.

3.  With the untouched square, sew ribbon onto center as seen above.

4.  With the other side of ribbon, sew it onto the button.  

5.  "Button" each square of felt to your snake.  

Sunday, June 23, 2013

Candle or Cookie Jar Wraps

My friend Jenine sent this to me during a craft swap and I thought it was PURE GENIUS!  These are wraps for large Jar candles like Yankee Candles or large mason jars that you would do cookies in a jar for gifts.  You simply wrap this around the jar and it covers the label and turns your candle from an advertising scheme into a cute addition to your home - or adds that extra festive touch to any mason jar treat! 

These are something that I will certainly be making for this Christmas and all the gifts we give out.  Simple, EASY and SUPER SUPER SUPER cute!


Items Needed:
 Fabrics of your choice
A sewing machine (or hand stitch)
SEW ON Velcro
Embellishments
Needle point floss

Directions:
1.  Cut large piece of fabric out to be 16 inches x 5 1/2 inches

2.  Cut short piece of fabric to be 4 inches x 3 inches

3.  Fold edges over 1/4 inch twice (on top of itself so you don't see actual edges) and iron down.  Once all four edges are folded and ironed, sew them together.

4.  Cut sew on velcro to be 3 inches long.

5.  Sew velcro onto fabric.  One piece (the soft side) is sewn onto the front LEFT of fabric.  Now flip the fabric over and sew the other piece (rough side) to the Back LEFT of fabric.  Velcro should be on opposite sides and opposite ends when done.

6.  Decide on what you want the wrap to say.  Then using needle point, stitch it into your small piece of fabric.  Add any embellishments at this time.

7.  Sew small piece of fabric onto Large piece of fabric centered.

Friday, February 1, 2013

Cute Homemade Bag

My friend Jenine made this for me.  To say I love it, would be putting it lightly.  Upon receiving it, I immediately began to use it as my purse and that's what it's been since.  I love the simple fabric flower that she added as an embellishment and that it is lined.  The best part is that if it ever gets dirty, I can just toss it in the washer and clean it.  


Thursday, January 24, 2013

Needle Point Quilt

This is by far, the best gift I have ever received in my entire life.  I used to be a youth leader at church over the young women ages 12 - 18.  One of my Laurels (16 - 18 year olds) wanted to teach everyone how to do needlepoint as one of her 10 hour projects.  So she taught us all how to stitch these hearts and our names.  When she was done, she presented it to me as a birthday gift.  I love quilts.  I love homemade items.  But I especially love that she did this just for me as a surprise! I will always treasure this.

Thursday, January 17, 2013

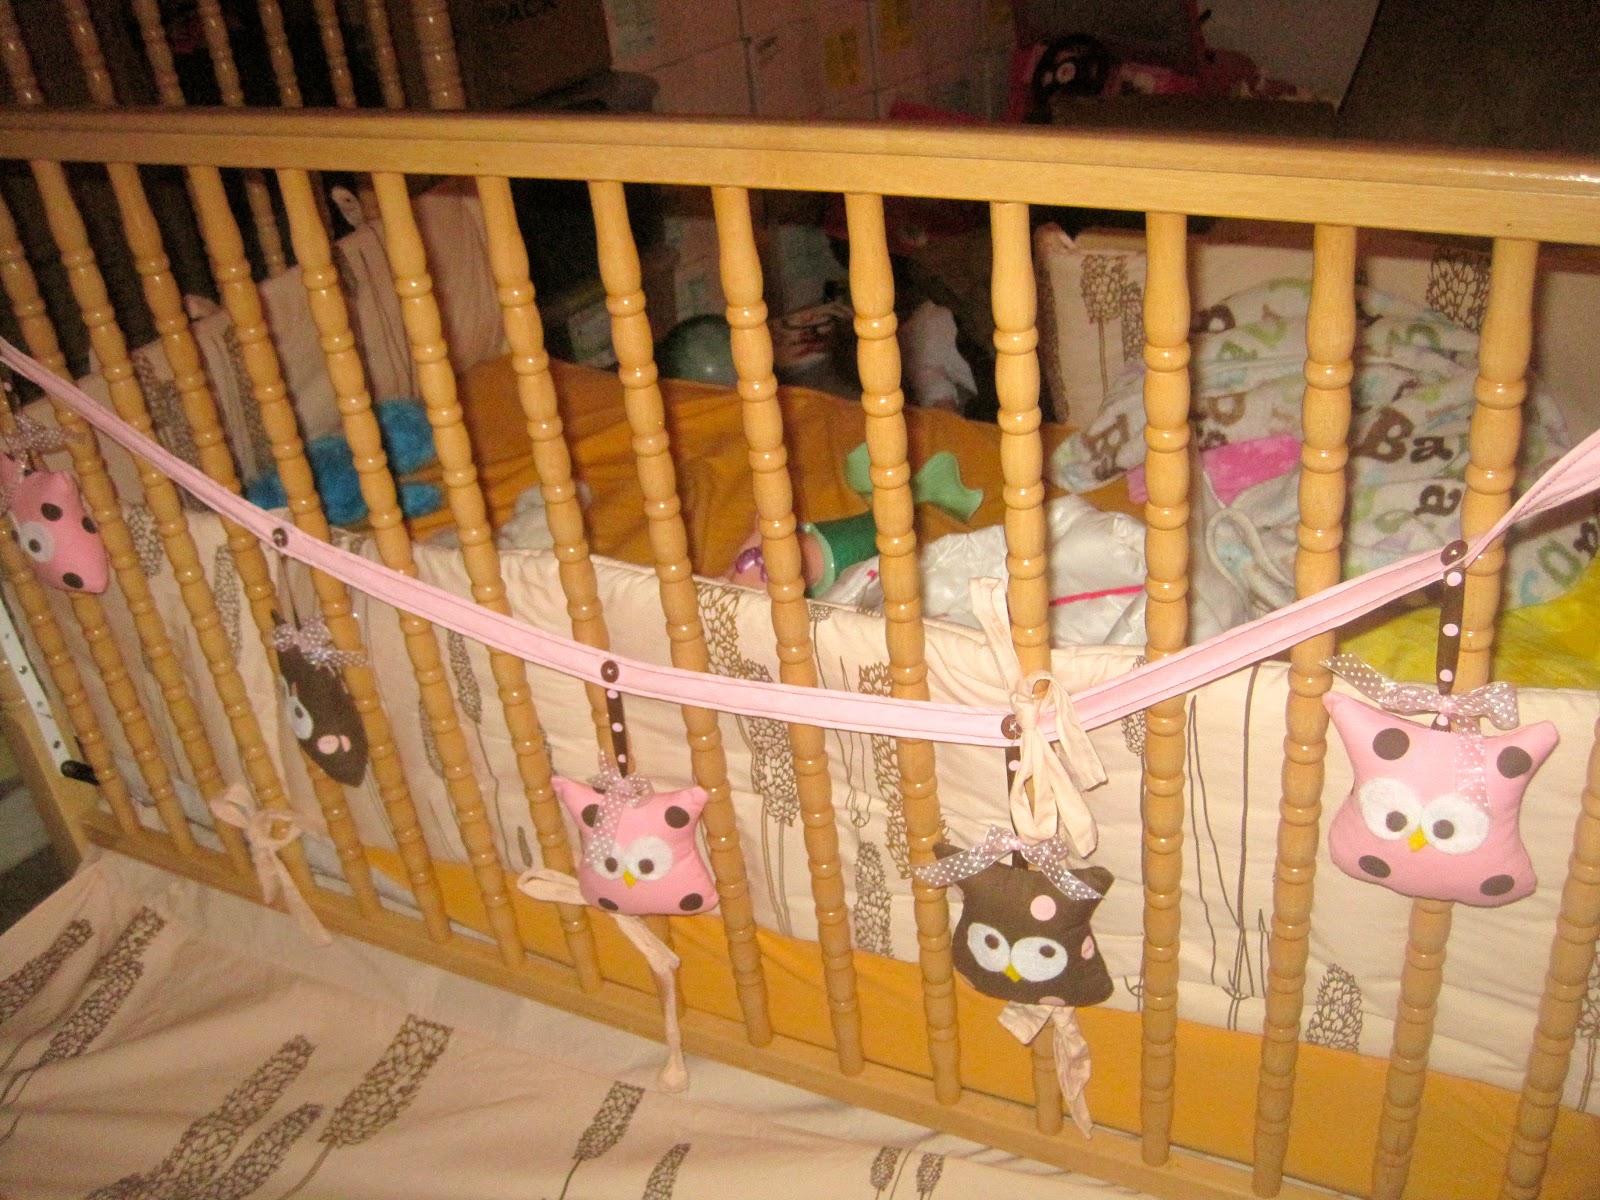
Owl "Banner"

My friend Tanys sent me this just after I had my daughter.  Her room was done in brown and pink and in our old home we had these hung from the windows.  However in our new apartment, the only place it looked decent was on her crib.  

Unfortunately, we just converted her crib into a toddler bed and so these are now on the back of the crib until I can find a new place for them, so please excuse the pictures.

I love the detail in each of these.  There are 5 owls attached by a button to a fabric ribbon.  Each owl is stuffed and hung with cute ribbon.  I also love the extra touch of the sheer pink ribbon above the owl. 

They are then attached to each side of the crib with the same ribbon sewn to the end of the pink fabric ribbon (picture forgotten).  

Overall, my daughter LOVES these and at night/morning would play with them.  By far one of my favorite gifts!


Quick Aprons

I am a very visual person, and as a general rule of thumb can look at most crafty things and reverse engineer them in my head and recreate them.  And when I sew I NEVER use a pattern.  Probably for the main reason that I have no idea how to use a pattern.  :)

My friend Erin made me this apron during a Christmas craft swap.  I love it.  It's simple, cute and comes with a pocket.  I've never made aprons before, and after looking at this and how stinkin EASY it looked to make, I decided to make them for several people for Christmas.   Girls got green ones, boys got marvel ones and there were even a few for kids too.  

Unfortunately I didn't take measurements and so I can't give you a proper tutorial.  However, a good rule of thumb is to cut the fabric knee length and all the way around the waist so it covers your hips.  Since we are each different sizes, just use that a a good rule of thumb and you too could recreate this amazing gift!


Baby Girl Onesie

I saw this idea on Pinterest and thought it looked easy and super cute for a little girl.

The paint "beads" took a matter of 5 minutes + drying time.  The rosette took a few tries to get it the way I wanted but it too was super quick to make.  

Then it was time to put the two together.  I hot glued the rosette onto the onesie and then sewed the edges to add extra stability.  

After all was said and done, Shizam!  A cute onesie for a cute little girl!


Saturday, December 1, 2012

Luggage Tags

Going on a trip?  Hate when your luggage looks like everyone elses?   Why not whip up some luggage tags like my friend Tanya did for me!  

So simple and yet so fun!  These would make a GREAT gift as well!


Items Needed:
Sewing Machine
Ribbon
Fabric
Sheet of durable plastic (for the view hole).

Directions:
Anything I write here will be my making it up.  But all in all, just looking at them it looks quite simple.
Here is a tutorial  to directions on how to make your own.  Obviously they are not the same ones but a great tutorial nonetheless!

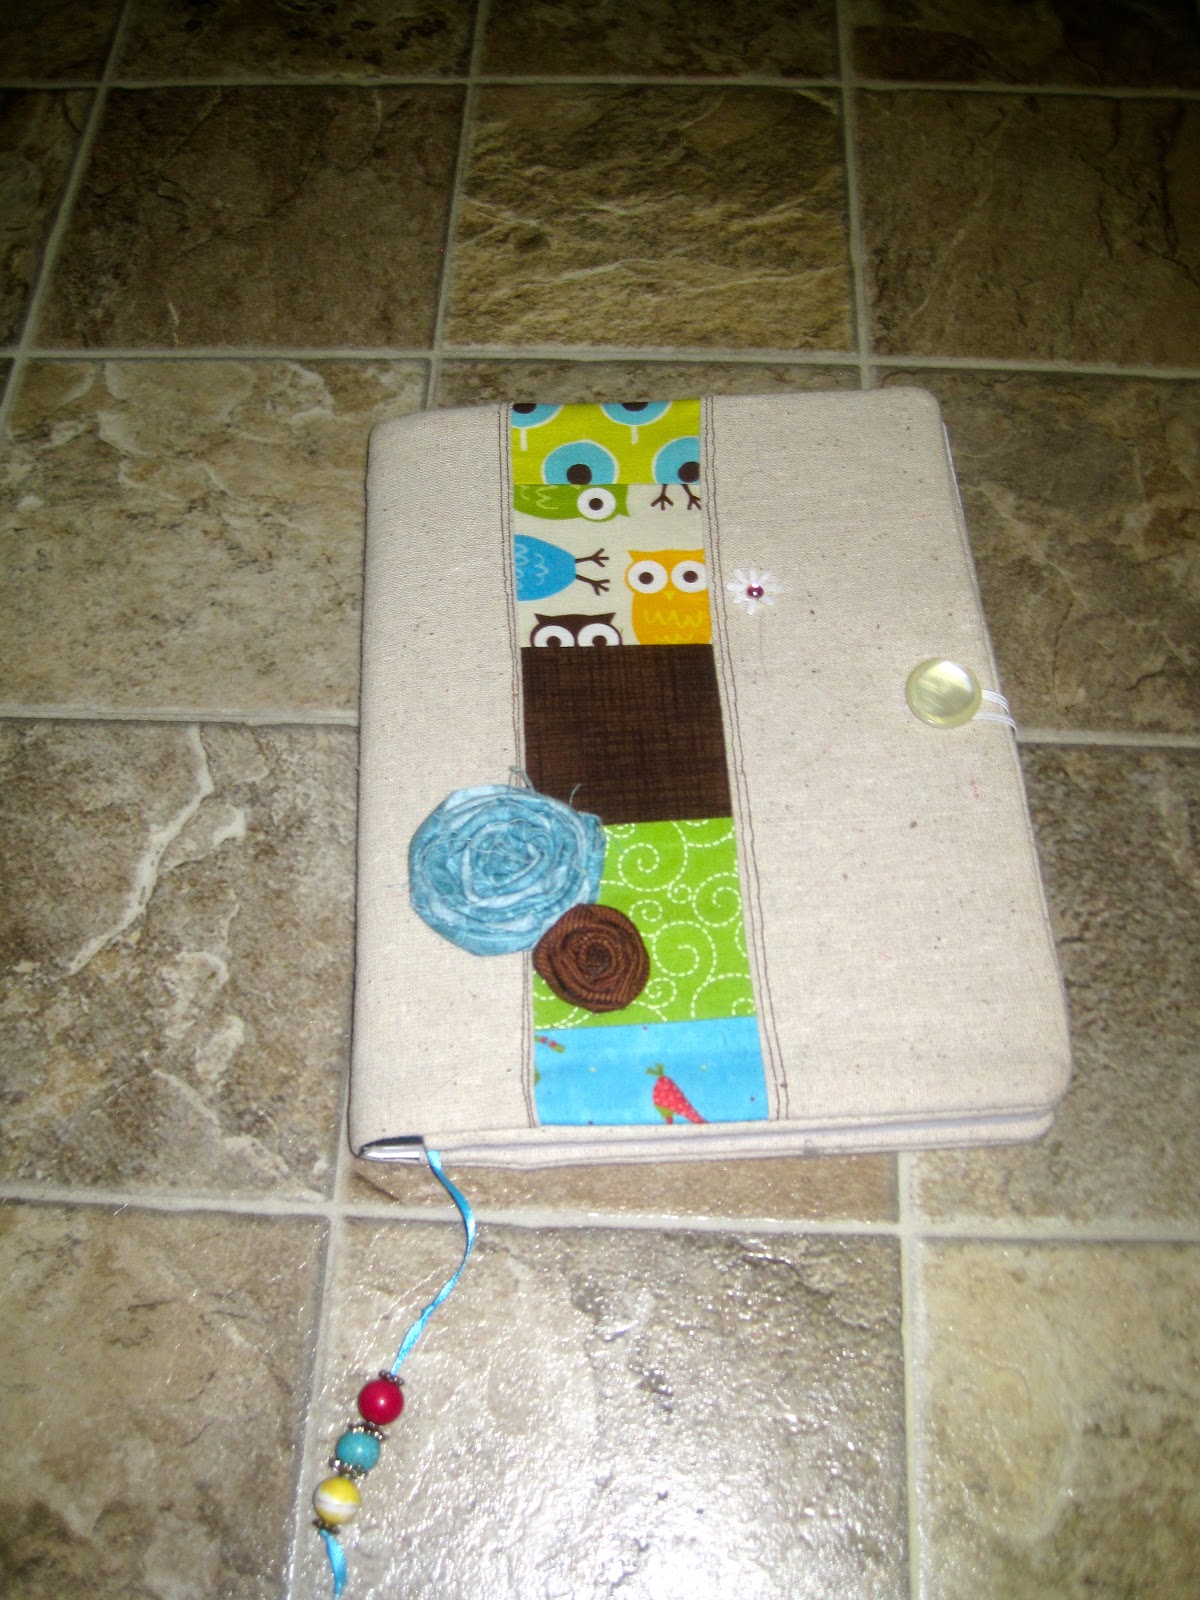
Journal Covers

I don't have a tutorial for this, but wanted to show you how awesome this journal cover my friend Tanya made for me is.  

There are several aspects that I want to point out.  
First, I love how it's got a section of patchwork.  Adds so much character to it.
Second, I love the rosettes.  Rosettes make everything look better.
Third, I LOVE the bookmark.  What a great way to keep track of where you are AND I love how it hangs at the bottom with beads.
Fourth, I love how on the inside cover it has a pencil holder (owl fabric) AND another pocket to keep anything in like post it notes. Again, patch work.
Fifth, I love how on the back it has a pocket too!
Sixth - It's 100% removable. So when I'm finished with the book, I just whip it off and put it on a new book.  
Seventh, I love how it has a button fastener.  

Really this is such a great idea!  Much better than covering a note book with doodles or comics!


Homemade Ornaments

My Mother-in-law made these last year for our daughter.  I love them and thought they were a great idea.  The top one is a candle and the bottom one is an angel.  A homemade Christmas ornament is something that she will always remember and cherish.  (Even if she calls them donuts.)


Santa Apron

My friend Julia made me two santa aprons!  
These are so cute AND so easy to make.  


Items Needed:
Red Apron
White "fur/fuzz" fabric
Yellow Fabric
Black Fabric
Iron
Sewing machine or needle & thread

Directions:
1.  Cut the white fur/fuzz to be the exact size of the top of the apron.  

2.  Sew the fur/fuzz on.

3.  Using black fabric, cut width of apron + 36 inches in length (18 inches for each side), and approx. 4" wide.

4.  Fold black fabric 1" on each side (width) and iron down.  Then sew together.  This should make your black "belt" 2" wide by 36+ width of apron long.

5.  Sew black belt onto apron - make sure it is center.

6.  Cut out a 2 1/2" yellow square.  

7.  Cut out rectangle center of square.

8.  Place the yellow fabric square on center of black belt and sew down.

Friday, November 30, 2012

Stroller Blanket Holder

My friend Yuki made these for us.  I think it's one of the most ingenious ideas EVER.  
You attach one strap to each side of your stroller.  Then use them to hold your blanket onto your child's lap so it doesn't fall off!  


Items Needed:
Hanger Clips (found on department store hangers)
Ribbon
Felt Flowers

Directions:
1.  Pop off the clips from the department store hanger.

2.  Cover clips with felt and flowers

3.  Attach ribbon to clips.

4.  Loop Ribbon to make a hoop on the end (to attach to stroller).

These are one of those DUH crafts.  Duh! Why didn't I ever think of that!  It works great and now I don't have to worry about my daughters blanket falling off her lap as we go on our walks.