Showing posts with label Kids. Show all posts

Thursday, December 5, 2013

Baking Soda & Vinegar

Remember how cool those volcano science experiments were?  I do.  Not only were they cool, but they were also super fun!  And my 2 year old also thought it was pretty fun too. In fact, it's one of her most requested activities for rainy/snowy days.  

Our fun has two parts.  1) Pouring small amounts of the vinegar into the baking soda and watching it bubble and 2) Once all the baking soda is covered with vinegar and no longer bubbles, it's super fun to squish with your fingers and feel the goo as it slips right through.  This activity will literally keep my toddler busy for 30 minutes to an hour each time.

Oh and don't forget to color the vinegar with food coloring so they can see better where it's been.


Items Needed:
Baking Soda
Vinegar
2 Dishes (I use a pie dish & Tupperware bowl)
Spoon (I use a tablespoon)

Directions:
1.  Pour vinegar into bowl (I use Tupperware)

2.  Put a few drops of food coloring.  One or two will do.

3.  Pour baking soda into the other dish (I use pie dish)

4.  Show child what to do.  Strongly emphasize that they should NOT put baking soda INTO the vinegar.  ONLY vinegar into baking soda.  If they do put baking soda into the vinegar mixture, then the entire bowl will bubble over and the vinegar will no longer be active.  


Bath tub painting

I discovered very quickly, that when it came to my daughters love of painting, it also came with an the expense of a LOT of paper.   So instead of endless reams of paper, I'd pop her into our tub with some watercolors and a paintbrush.  And sure enough, she loved it.  So much so that we did it a LOT.

It's CHEAP, clean up is a breeze and kept my daughter busy for a very long time.  

Few things to note:  Porcelain (or non porous) tubs are best for this.  The paint literally washes right off.  It also easily comes off of non porous tile as well.
I've also done this in plastic tubs.  The plastic though sucks in the paint and holds onto it.  It will come out with some elbow grease and magic erasers.  Just be prepared to work for it.  


Tuesday, September 3, 2013

Felt Board Pictures

My friend Alicia made my daughter some flannel board photos for a craft swap.  They are so cute and she even used photos of our family in them.  And the best part is that they are SUPER easy to make.  Seriously when she told me how she did them, it was one of those "duh, why didn't I think of that" moments.  These work great for story time, quite activities or even for Church as they'll stick to the back of the bench!


Items Needed:
Pictures - can be printed from computer or photos or magazine cut outs.  
Flannel of any color
Clear vinyl table cloth
Sewing Machine
Scissors

Directions:
1.  Cut out or print out any pictures you wish to use.

2.  Lay picture onto flannel. 

3.  Lay clear vinyl table cloth on top of photo.

4.  Sew around the edges adhering the vinyl table cloth to the flannel.

5.  Cut out around shape of picture.

*Note:  You can also precut the flannel and table cloth before sewing.  The choice is up to you.

Sunday, July 14, 2013

Story Starter Picture Cubes

My friend Angela sent this amazing craft to me during a swap.  Ok, really it's for my daughter, but I can still play with it too!  I have never heard of this and LOVE LOVE LOVE this idea.  

You've never heard of it either?  Well here is the concept:  Roll each dice to figure out the Who, What Where and When - then YOU get to put all these together along with the Why and create a story!

You can buy story starter blocks but nothing as amazing as these!  So why not whip up your own!


Items Needed:
(4) 1" blocks
Gel Pen
Notebook & Pen
Cute box to hold the blocks in (found at any craft store)
Cheat sheet (as pictured above)

Directions:
1.  On each block draw the pictures as seen in the cheat sheet photo with the gel block.  

2.  Decorate your box with fun colorful pictures

3.  Decorate your notebook if not already decorated.

4.  Print out or make a cheat sheet

5.  Assemble all and include a cute note.

Christmas Countdown Muffin Tin Calendar

I started this craft a few years ago and finally just finished it.  I think it turned out amazing.
Have you heard of muffin tin calendars?  No?  Then Jump on board and make one for yourself.


Items Needed:
(1) Mini 24 count muffin tin
Scrapbook Paper
Embellishments
Vinyl lettering (purchased or made yourself)
Mini Magnets or a magnetic roll
Number stickers
Hole Punch
Glue Dots / Zots
Glue of your choice

Directions:
1.  Cut (24) 2" squares from solid card stock

2.  Cut (24) 1 3/4" squares from festive card stock 

3.  Attach the festive card stock to the solid card stock

4.  Add embellishments to each square using stickers, paper, ribbon, etc.

5.  Add number stickers to each square.

6.  Using mini magnets that you purchased attach four to each square (one on each corner).  
If you did not buy any, then you get to make your own (like me)!  Roll out your magnetic roll and using a single hole punch, punch out tiny magnets.  This will make the perfect size magnet.  Now GLUE your magnet to the paper.  The adhesive that comes with the magnet is not strong enough.

7.  Using pre-purchased vinyl or a cricut or silhouette attach the words Christmas Countdown to your muffin tin.  Mine were 3/4" tall as that is what fit best on my muffin tin.

8.  Now attach the squares to your muffin tin.

9.  When it comes time to use it, hide a note or treat in each hole for your children/spouse/friends to find.  Open one a day until Christmas!

Button Snake

In a quiet activity swap I did a few years ago, I received this button snake.  I had never heard of a button snake before then and have found this little gem to be priceless.  It's SUPER easy to make and has really helped my daughter learn about buttons and kept her busy in church and long car rides.


Items Needed:
One large button
12" of ribbon
Varying colors of felt
Needle 
Thread

Directions:
1.  Cut out (12) 3" squares from your felt.  If 3 colors of felt, then you want to cut 4 of each color.

2.  Cut a slit in each felt square large enough for the button to pass through with the exception of one.  Leave one square untouched.

3.  With the untouched square, sew ribbon onto center as seen above.

4.  With the other side of ribbon, sew it onto the button.  

5.  "Button" each square of felt to your snake.  

Monday, January 28, 2013

Photo Block Cubes

For one of my craft swaps, the theme was "photo."  So I decided to make this wooden block puzzle for one of the girls using photos she had sent me. 

The final product turned out great, however this is a VERY LONG and time consuming project as there is a lot of "drying time" involved.


Items Needed:
(9) 2" blocks
(6) 8x10 Photos.  Each photo needs to cover a 6x6" area so be choosey 
when deciding which pictures to use as you'll be cutting them down.
Modpodge
SPONGE paint brushs
Paper cutter

Directions:
1.  Cut each 8x10 photo down into a 6x6 photo.

2.  Cut each 6x6 photo down into (9) 2" pieces.  3 across and 3 down.

3.  If you are cutting the blocks yourself then sand them so there are no rough edges.  

4.  Using ONE photo (9 squares) begin modpodging them onto your cubes.  One square per cube.  Once the photo is on the block, let dry.  

5.  Once dry, modpodge over the top of each photo.

6.  Once that entire photo is on the blocks turn all the blocks over to a blank side and do the entire process again.  You will do this a total of 6 times (as each block has 6 sides.

This makes a fun gift for grandparents or for your kids as they will get to assemble puzzles together and be reminded of wonderful family memories.

Temple Photos

Each year, our stake would host a Priest/Laurel temple trip.  We'd get group pictures and individual pictures of the youth with the temple in the background.

We decided to add that years theme to the photo (every single photo) and as a graduation gift, frame them and hand them out to our seniors.  The Juniors received unframed copies for them to keep.  I love how simple it is to add any text you want to a photo before printing and what a great reminder of the memory of that trip and the theme for the year.

This could be done on any level and for any occasion.

Secretly my desire is to do this for my daughter and mount the photo onto wooden blocks. 


Iron On Onesies

In anticipation of my little lady coming into the world (back in 2003) and a friend who also had a little boy around the same time, I decided to make up some cute onesies.  I had seen these logos all around and loved them.  It was as simple as an iron on logo onto a onesie.  I loved them and she did too.


Items Needed:
Onesies (size of your choice)
Cute logos you find online or create your own.
Computer
Color Printer
Iron on transfer paper
Iron

Directions:
1.  Using your computer, find the logo/saying you want.
2.  Copy and paste it into word.  It's best if you do several at one time putting them all onto your word document.
3.  Flip all the logos/sayings/photos so they are all backwards - VERY IMPORTANT!

4.  Print in color onto one sheet of iron on transfer paper. 

5.  Cut out each logo. 

6. Iron (NO STEAM) the logo onto your shirt.  High heat and S-L-O-W!  After you have gone over the entire logo a few times, put your iron on the logo and starting with the corner, slowly pull back the paper, your logo should remain on the shirt and the paper come off.  Slowly back your iron up as you pull the paper.  Keep heat on the parts that are still attached to the paper. 
If you do this fast you will have a funky looking label.  If you go slow, you will have a great looking label.

Thursday, January 17, 2013

Owl "Banner"

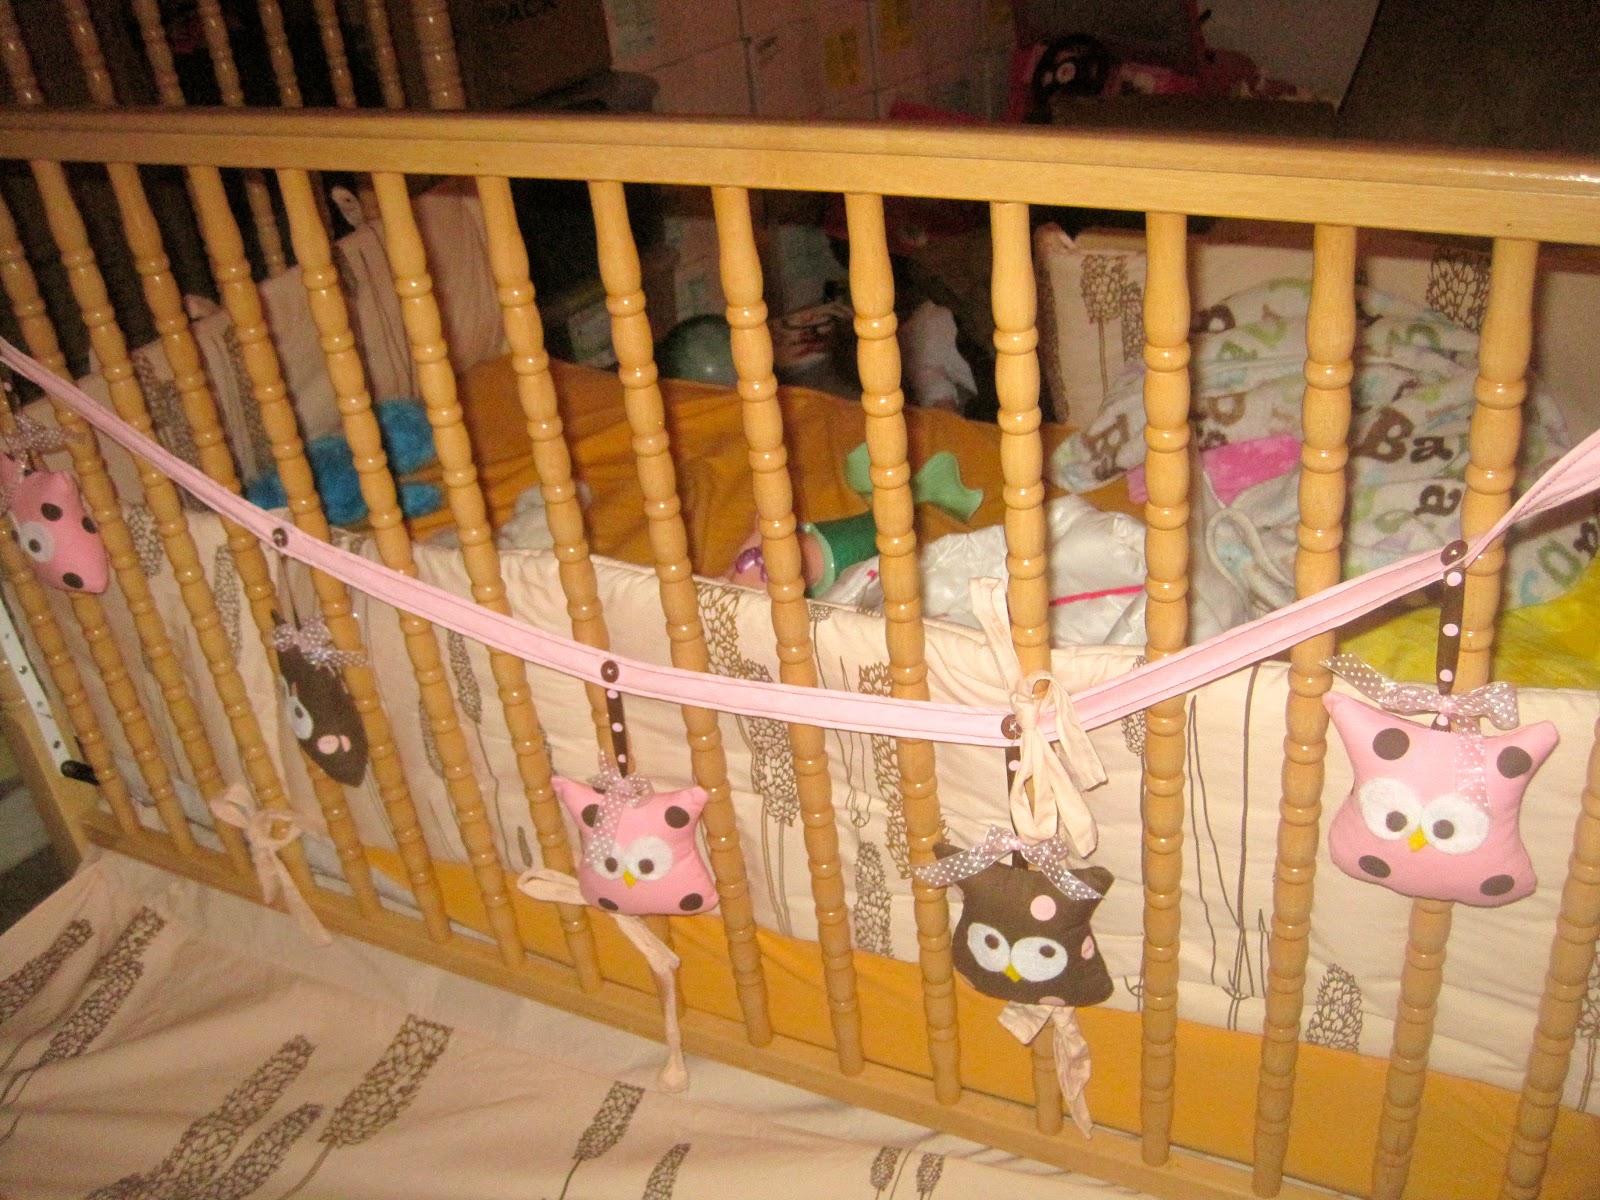
My friend Tanys sent me this just after I had my daughter.  Her room was done in brown and pink and in our old home we had these hung from the windows.  However in our new apartment, the only place it looked decent was on her crib.  

Unfortunately, we just converted her crib into a toddler bed and so these are now on the back of the crib until I can find a new place for them, so please excuse the pictures.

I love the detail in each of these.  There are 5 owls attached by a button to a fabric ribbon.  Each owl is stuffed and hung with cute ribbon.  I also love the extra touch of the sheer pink ribbon above the owl. 

They are then attached to each side of the crib with the same ribbon sewn to the end of the pink fabric ribbon (picture forgotten).  

Overall, my daughter LOVES these and at night/morning would play with them.  By far one of my favorite gifts!


Ornament

My friend Georgia made this ornament for me during a Christmas craft exchange.  And thought it would be a GREAT project for anyone, but especially kids to make as christmas gifts.  

It's so easy and so cute and looks great on our tree.  Print two candy canes on card stock (or any image).  Cut them out.  Color them and tape a picture behind it and shizam, you have a great and fun christmas ornament.   


Baby Girl Onesie

I saw this idea on Pinterest and thought it looked easy and super cute for a little girl.

The paint "beads" took a matter of 5 minutes + drying time.  The rosette took a few tries to get it the way I wanted but it too was super quick to make.  

Then it was time to put the two together.  I hot glued the rosette onto the onesie and then sewed the edges to add extra stability.  

After all was said and done, Shizam!  A cute onesie for a cute little girl!


Thursday, November 29, 2012

Keeping Christ In Christmas: Witness of Christ Advent Calendar

Our goal this year in giving gifts was to incorporate Christ into the gifts.  After a family discussion we decided to do an advent calendar where each day would feature a particular person in either the Bible or Book of Mormon that either witnessed or was associated with the Birth of Christ.  We would include a short note about the person and a photo featuring our daughter as the person.  We were quite excited about how it turned out and hope our families like it too.  Below is a picture of what each envelope looked like as well as the photo and note given inside.  Click the person's name for a link to the information on the person we included. (Note some of the photos are slightly different in the photos enclosed in the envelopes.  The icons were so small when choosing them for the blog that I occasionally choose the wrong one.

We attached the picture to the back of each message and punched a hole in it.  We also provided a ring for the families to keep them all together for future reference.  In addition, we also wrote on the back of each photo of who the photo is of and the age of our daughter in case they ever got separated.


Day 2:  Zacharias


Day 3: Elisabeth


Day 5:  Mary


Day 6:  Joseph


Day 9: Simeon


Day 10: Anna


Day 12: Herod (This is Amelie's scary face)


Day 13: Isaiah


Day 14: Nephi


Day 15: Abinadi


Day 16: Alma


Day 21: Inn Keeper
This story is found in one of my LDS stories from Christmas books.  It's my favorite.  I also found it on the above linked site.  


Day 22: Janelle's Testimony:


Day 23: Ben's Testimony


Day 24: Amelie's Testimony (27 months old)
These are Amelie's exact words: I like Jesus at home and in the car.  In somebody's truck.  Jesus' mommy.  A Jesus basket.  A Jesus present.  Jesus has good socks.  "Is Jesus your friend?"  YEAAAAA! (couldn't have said it better myself)